安装Pgpool-II
Pgpool-II是一个位于PostgreSQL服务器和PostgreSQL数据库客户端之间的中间件,Pgpool-II提供了连接池(Connection Pooling)、复制(Replication)、负载均衡(Load Balancing)、缓存(In Memory Query Cache)、看门狗(Watchdog)、超出限制链接(Limiting Exceeding Connections)等功能,可以基于这些特性来搭建PostgreSQL高可用集群。
yum安装
官方参考地址
Yum Repository
Installation from RPM
- 安装CentOS7的yum源。
1 | $ yum install http://www.pgpool.net/yum/rpms/4.0/redhat/rhel-7-x86_64/pgpool-II-release-4.0-1.noarch.rpm |
- 安装支持PostgreSQL10版本的pgpool-II
1 | $ yum install pgpool-II-pg10 |
- 服务开机启动
1 | $ systemctl enable pgpool.service |
- 启动/停止服务
1 | $ systemctl start pgpool.service |
配置Pgpool-II
参考文章
实例准备
| role | ip | PostgreSQL | Pgpool-II | port |
|---|---|---|---|---|
| master | 192.168.1.3 | 10.9 | 4.0.5 | 5432 |
| slave | 192.168.1.2 | 10.9 | 4.0.5 | 5432 |
| vip | 192.168.1.100 | – | – | – |
watchdog端口9000,pcp端口9898,psql服务连接端口9999
架构图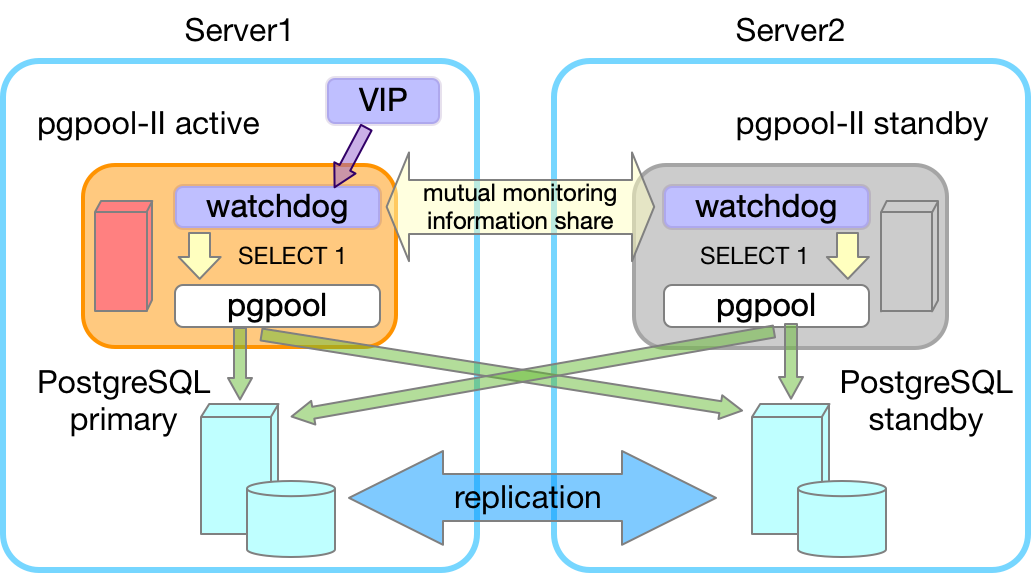
配置系统环境
配置程序运行的用户和组为 postgres
1 | # 创建或修改目录权限 |
配置认证方式
配置pool_hba.conf,要么都是trust,要么都是md5验证方式,这里采用了md5验证方式如下设置
1 | # "local" is for Unix domain socket connections only |
配置pg_hba.conf,认证方式保持一致
1 | # "local" is for Unix domain socket connections only |
非必要可选步骤,为了集群可扩展性,可以将复制的认证条件放宽
1 | # Allow replication connections from localhost, by a user with the |
配置pcp
pcp.conf 配置用于pgpool自己登陆管理使用的,一些操作pgpool的工具会要求提供密码等,配置如下
配置用户名密码
1 | $ pg_md5 postgres |
添加pg数据库用户密码
在pgpool中添加pg数据库的用户名和密码,数据库登录用户是postgres,这里输入登录密码
1 | $ pg_md5 -p -m -u postgres pool_passwd |
配置系统命令权限
1 | $ chmod +s /sbin/ifconfig |
配置 pgpool.conf
primary
1 | $ cp pgpool.conf.sample-stream pgpool.conf |
编辑内容如下
1 | # - pgpool Connection Settings - |
standby
编辑内容如下
1 | # - pgpool Connection Settings - |
failover_stream.sh
配置failover_stream.sh脚本,内容如下:
1 | $ pwd |
设置主机互信
配置ssh秘钥,分别在master、slave上生成ssh密钥对,并设置主机互信。
1 | $ ssh-keygen -t rsa -b 1024 |
如果这个脚本的执行目标是本地,并且ssh本地登陆没有设置免秘钥,那么这个脚本会一直卡在输入密码的阶段,这时候主备自动切换过程就阻塞了。如果 pgpool和 postgresql在同一台机器部署,需要添加本地登陆免秘钥。
1 | $ pwd |
启动集群
分别启动master、slave的PostgreSQL服务
1 | $ systemctl start postgresql-10.service |
分别启动各节点Pgpool-II服务
1 | $ systemctl start pgpool.service |
集群状态
用vip登录集群,查看状态
1 | $ psql -p 9999 -h 192.168.1.100 -U postgres |
至此,基于 Pgpool-II 中间件的 PostgreSQL 集群搭建完成。
PCP命令
获取节点数
1
2
3
4
5
6
7
8# 获取192.168.1.3可见节点数
$ pcp_node_count -h 192.168.1.3 -p 9898 -U postgres
Password:
2
# 获取192.168.1.2可见节点数
$ pcp_node_count -h 192.168.1.2 -p 9898 -U postgres
Password:
2获取节点信息
1
2
3
4
5
6
7
8
9# 查看节点0信息
$ pcp_node_info -h 192.168.1.3 -p 9898 -U postgres 0
Password:
192.168.1.3 5432 2 0.500000 up primary 0 2019-08-08 16:11:26
# 查看节点1信息
$ pcp_node_info -h 192.168.1.3 -p 9898 -U postgres 1
Password:
192.168.1.2 5432 2 0.500000 up standby 0 2019-08-08 16:13:14
$从
pgpool-II中脱离一个节点
该命令将节点slave从pgpool-II中脱离。一般如果需要维护某个数据库节点、或不希望pgpool-II将连接分发到该节点时,需要将该节点从pgpool-II中用该命令脱离。1
$ pcp_detach_node -h 192.168.1.100 -p 9898 -U postgres -n 1
为
pgpool-II关联一个节点
该命令将节点slave关联到pgpool-II中。当维护结束,或新添加一个节点后,可以将节点添加到pgpool-II。
另外,如果该节点由于主机或数据库故障导致检测到数据库为启动时,即使后期服务器重新修复、数据库手工启动,也需要执行attach操作。同时需要注意从两个节点上观察是否节点都已经attach。1
$ pcp_attach_node -h 192.168.1.100 -p 9898 -U postgres -n 1