Kong高可用方案

前言

只要 kong 的后端数据库做到了高可用,kong 的高可用水到渠成。
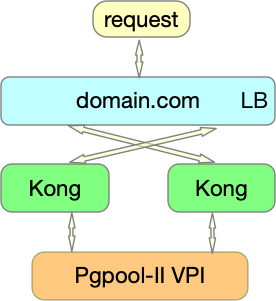
架构图

Kong高可用

安装Kong

Kong官网下载相应的rpm安装包或者获取下载链接。
下载安装包

1
$ wget https://bintray.com/kong/kong-community-edition-rpm/download_file?file_path=centos/6/kong-community-edition-1.0.0.el6.noarch.rpm

安装

1
$ yum install kong-community-edition-1.0.0.el6.noarch.rpm

配置

1
2
3
4
5
6
7
8
9
$ grep -Ev '^#|^$|^ ' kong.conf
plugins = bundled,upstream-auth-signature,upstream-url-penetrate # kong的可选自定义插件
proxy_listen = 0.0.0.0:6002, 0.0.0.0:6443 ssl # kong的服务地址
admin_listen = 127.0.0.1:6001, 127.0.0.1:6444 ssl # kong的后台管理地址
pg_host = 192.168.1.100 # 这里填写PostgreSQL集群Pgpool的VIP地址
pg_port = 9999 # Pgpool服务端口
pg_user = kong # 用户名
pg_password = kong # 用户密码
pg_database = kong # 数据库名

用其中某个节点,来初始化数据库

1
2
3
4
5
Kong版本高于0.14.1
$ kong migrations bootstrap

Kong版本低于0.15.0
$ kong migrations up [-c /etc/kong/kong.conf]

各个节点启动服务

1
$ kong start [-c /etc/kong/kong.conf]

各个节点配置nginx反向代理

1
2
3
4
5
6
7
8
9
10
11
12
cat kong.conf
server {
listen 80;
server_name kong.domain.com;

location / {
proxy_connect_timeout 120s;
proxy_read_timeout 120s;
proxy_send_timeout 120s;
proxy_pass http://192.168.1.10:6002;
}
}

测试服务

1
2
$ curl http://kong.domain.com/
{"message":"no route and no API found with those values"}
----------------本文结束 感谢阅读----------------